Hallo Zusammen,
wolltet Ihr auch schon mal in einem Power BI Report eure eigenen Bilder als Filter verwenden? So wie in den DIAD Kursen, in dem die Logos der Hersteller als einfaches Filterfeld verwendet werden? Ich habe gestern eine kleine Umfrage auf LinkedIn geschaltet und gefragt wie würdet Ihr das bewekstelligen? Die Antworten waren ähnlich, doch bezogen diese sich größtenteils nur auf das einfügen der Logos im Power BI Desktop. Dabei wurde komplett außen vor gelassen wo die Logos gespeichert werden und wie man diese in Power BI Desktop als Datenquelle einbinden kann. Daher möchte ich euch heute den kompletten Weg zeigen. Ich zeige euch in zwei einfachen Click Tips wie das funktionieren kann. Ihr benötigt für diesen Click Tip folgende Dinge:
- portal.azure.com (einen Microsoft Account und eine Test Subscription für Azure. Habt ihr nicht kein Problem diesen könnt ihr euch für ein Jahr kostenlos abonieren (Azure Subscription) -> hier)
- Power BI Desktop
- Vorab gespeicherte Bilder die Ihr als Filter nutzen wollt in .png Format
Hi together,
did you ever want to use your own images as filters in a Power BI report? Like in the DIAD courses, where the manufacturers‘ logos are used as a simple filter field? I posted a little poll on LinkedIn yesterday and asked how would you do that? The answers were similar, but mostly just related to inserting the logos into the Power BI desktop. They completely left out where the logos are stored and how they can be integrated into Power BI Desktop as a data source. So today I would like to show you the complete way. I will show you in two simple click tips how this can work. You need the following things for this Click Tip:
- portal.azure.com (a Microsoft account and a test subscription for Azure. If you don’t have a problem, you can subscribe for one year for free (Azure Subscription) -> here)
- Power BI Desktop
- Pre-saved images that you want to use as filters in .png format
Öffnet azure.portal.com – navigiert zu den Storage Accounts – navigiert in die Container – legt einen neuen Container an – stellt den Container auf Public Access Level auf Container (anonymous access for containers and blobs (dass bedeutet das diese öffentlich einsehbar sind für jeden, der den Link bekommt) – ladet nun eure Bilder (.png Format) in den Container – fertig
Open azure.portal.com – navigate to the storage accounts – navigate into the containers – create a new container – set the container to public access level on container (anonymous access for containers and blobs (this means that they are publicly visible for everyone who gets the link) – load your images (.png format) into the container – done
Ein kurzer Gedanke dazu/ A quick thought on this
Der ein oder andere von euch wollte vielleicht auch mal ein eigenes Bild als „Filter-Element“ in Power BI einfügen?! Es gibt mittlerweile nicht nur mehr einen Weg, sondern mehrere. Ich nehme immer gerne diese Variante weil ich sie als sehr einfach empfinde. Ihr könnt diese ja auch einmal ausprobieren und schauen ob Sie euch gefällt. Der einzige Punkt der hier halt zu beachten ist, ist der dass ihr einen Zugang zu Azure benötigt um es umzusetzen. Aber ich glaube, dass ist auch eine schöne Übung um mal ein wenig in Azure kennen zu lernen. Ein signifikanter Vorteil dieser Variante ist, dass Ihr die Bilder im Azure einfach tauschen könnt und die neuen Bilder sofort (nach einem Refresh) im Power BI Desktop zu sehen sind.
Some of you might want to add your own picture as a „filter element“ in Power BI? Meanwhile there is not only one way, but several. I always like to use this variant because I find it very simple. You can try it out and see if you like it. The only point to keep in mind here is that you need access to Azure to implement it. But I think this is also a nice exercise to get to know a little bit of Azure. A significant advantage of this variant is that you can easily swap the images in Azure and the new images are immediately (after a refresh) visible in the Power BI desktop.
Bilder in Power BI Desktop einfügen/ Insert images into Power BI Desktop
Öffnet Power BI Desktop – geht auf Dateneingabe – fügt eine Spalte mit den Bildernamen hinzu – ladet diese Tabelle mit nur einer Spalte – navigiert zur Datenansicht auf der linken Seite (zweites Symbol am linken Rand) – wählt unter Tabellentools „neue Spalte“ aus – nutz nun folgendes Statement um eine neue Spalte zu erzeugen: „“ – bestätige die Eingabe – eine neue Spalte hat sich gebildet – navigiert nun zurück zur Berichts Ansicht (linker Rand, erstes Symbol) – markiert die neue Spalte grau – weißt der Spalte den Typen „Bild URL“ zu (Spaltentools) – nun könnt ihr das Matrix Visual nutzen um die Bilder zu visualisieren – fertig
Opens Power BI Desktop – goes to data entry – adds a column with the picture names – loads this table with only one column – navigates to the data view on the left side (second icon on the left margin) – selects „new column“ under Table Tools – now use the following statement to create a new column „“ – confirm the input – a new column has been created – now navigate back to the report view (left margin, first symbol) – mark the new column in grey – assign the column the type „Image URL“ (Column Tools) – now you can use the Matrix Visual to visualize the images – done
Ein kurzer Gedanke dazu/ A quick thought on this
Hier möchte ich nochmal kurz auf das Statement eingehen welches die neue Spalte bildet. Ihr seht in dem unten stehenden Bild das sich dieses Statement aus 4 verschidenen Teilen zusammensetzt. Dem Namen der Spalte, der URL vom Speicherort der Bilder (welchen Ihr im Azure Blob Storage seht, wenn ihr diesen öffnet), die Spalte mit den Bildernamen – dieser verbindet eure Bilder mit dem Datenmodell. Wenn Ihr diese Tabelle nun mit einer anderen Tabelle ergänzen wollt können die Bilder auch weitere Daten filtern, je nachdem wie eure Datenmodell aufgebaut ist. Der letzte Teil des Statements beinhaltet das Bild-Format in welchem Ihr die Bilder im Blob Storage abgespeichert habt. Ihr seht es ist recht simpel Bilder in ein Datenmodell als Filterelement mit auf zu nehmen. Testet es doch einfach mal mit euren eigenen Bildern.
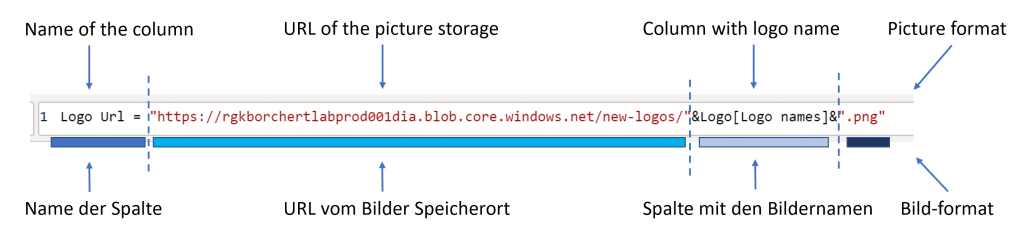
Here I want to mention again the statement, which forms the new column. You can see in the picture above that this statement consists of 4 different parts. The name of the column, the URL of the image storage location (which you see in the Azure Blob Storage when you open it), the column with the image names – this connects your images to the data model. If you want to add another table to this table, the images can filter more data depending on your data model. The last part of the statement contains the image format in which you have stored the images in the blob storage. You can see that it is quite simple to include images in a data model as filter elements. Just test it with your own images.